Milestone Worksheet
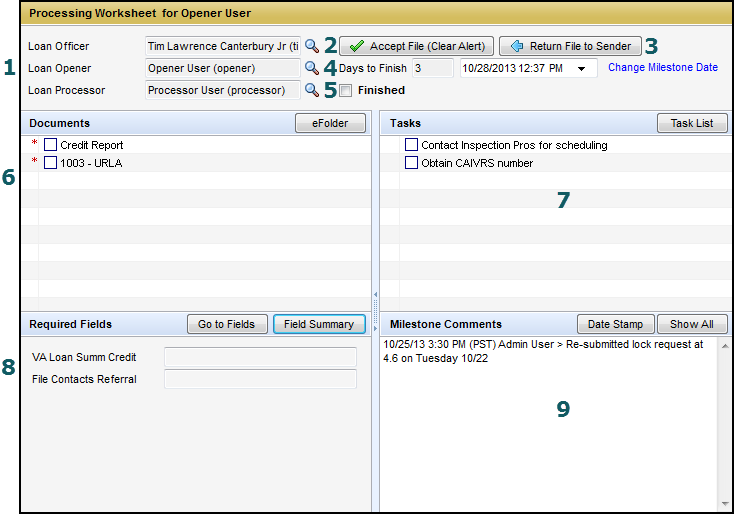
The milestone worksheet is used to record activities and the completion of the tasks associated with each milestone. This figure depicts all the possible options on a worksheet. The options you see and the tasks you are permitted or required to complete are based on the configuration of each milestone and your individual user settings.
The milestone worksheet is accessed by clicking on the respective milestone in the Log.
The milestone worksheet has the following sections:
Assigned Loan Team members. The assigned loan team members for the preceding, current, and next milestones.
Accept File (Clear Alert). Used by the assigned loan team member to accept the loan file and clear the associated alert.
Return File to Sender. Used by the assigned loan team member to return the loan to the previous milestone and loan team member.
Days to Finish. The number of days before the expected completion of the milestone. You can change the expected completion date as needed by clicking the drop-down arrow and then selecting the date on the calendar or by clicking the Change Milestone Date link.
Finished Checkbox. Used to indicate completion of the milestone and move the loan to the next milestone.
Documents. The list of documents needed for the milestone. Select check boxes to indicate receipt of documents. An entry for each receipt is created in the Log. Click the eFolder button to view document details.
Tasks. The list of tasks to complete for the milestone. Select a check box to indicate completion of a task. Click the Task List button to view task details.
Required Fields. Displays the fields that must be completed before completion of the milestone. You can enter values in the space provided next to each field. Click the Go to Fields button to locate the field on an input form. Click the Field Summary button to display a document that summarizes key loan information for the milestone (optional).